
Readings:
In the first article I read this week, author Jimm Fox, lists 11 pre-production steps for a successful project. If creators follow these steps and complete each one before starting to actually create anything then actually making and releasing the product/project becomes much easier and usually much more successful.
- Clearly Define Your Business Objective
- Define Your Audience
- Share Your Budget
- Develop Key Messages
- Develop a Creative Brief
- Find the Big Idea
- Treatment
- Storyboard
- Planned Distribution
- Length of Video
- Approvals
In another article written by Tubular Insights, author Mark Robertson talks about the importance of storyboarding and the best practices for visualizing a video. He talks about how storyboards are simple blueprint of your project so you have something to visualize before you actually start to make it. Robertson addresses the fact that it doesn’t need to be a work of art, but that once you have the different shots drawn out you should also include things like time of day, location and how you might verbally describe the shot to other people. Robertson also includes a video on how to make the most effective storyboards.
Another important thing to know other then different visual compositions and the importance pre- planning is different types of shots. In the article, Acting Tips: 12 Camera Shots Every Actor Should Know, author Helen Kantilaftis. The basic ones that she goes over are:
- Ariel Shot
- Establishing Shot (this is different from the master shot because this usually is used when introducing the exterior of a new location to the audience)
- Close Up (CU)
- Extreme Close Up (ECU)
- Medium Shot (MS)
- Dolly Zoom
- Over-the-shoulder (OTS)
- Low Angle Shot
- High Angle Shot
- Two Shot
- Wide/Long Shot (WS)
- Master Shot (yes this is different from the establishing shot, this shows you where key players in a scene will be sitting or standing and the layout of the room.)
In order to fully comprehend visual composition, montages and the importance of pre-production I also read a few chapters from the book, “The Bare Bones Camera Course for Film and Video” by Tom Schroeppel. In chapters 1 and 2 he talks about the basics of camera work like,
- Exposure
- Color Temperature
- Light Meters
- Lenses
- Focus
- Depth of Field
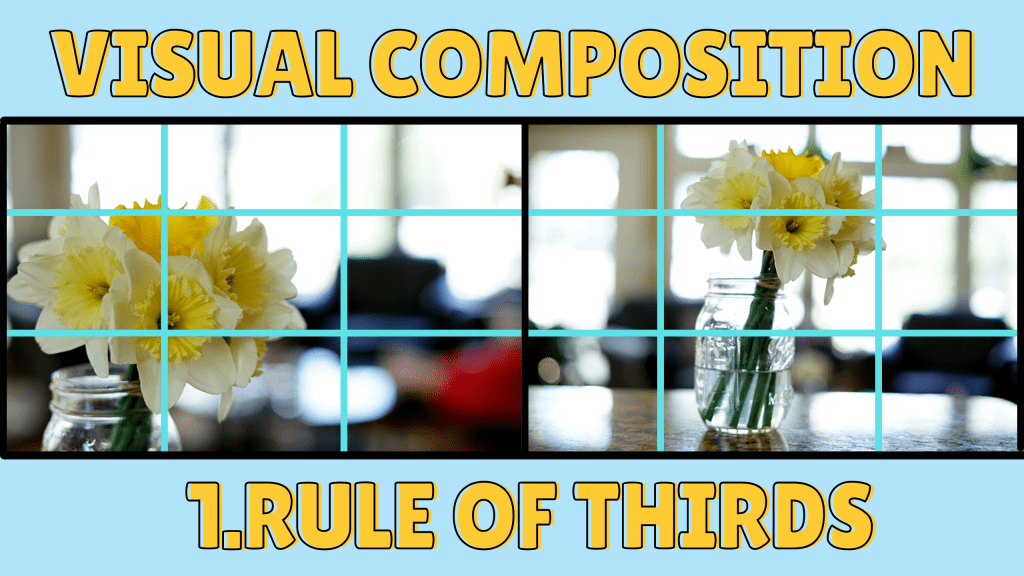
Schroeppel also discusses the importance of composition and creating a pleasing image for viewers using visual cues like leading room, the rule of thirds, balance, colors, and framing in your natural environment. He describes the camera as “a tool for looking at things in a special way.”
In chapters 5 and 6 he Schroeppel talks about camera moves and montages. The camera moves that he describes are very similar to the article above by Kantilaftis. And he describes montages as “a series of related shots used to condense time or distance, set a mood, or summarize information.” Montages are used in more than half of the most popular TV shows and films. They can show a relationship between two characters or objects but cutting back and forth between to simultaneous plots. They can show the passage of time by cutting to the same action happening over and over again over a long period of time. They can also be used to showcase a certain place, person or object using an array of different types of shots edited together to create a visual story.
Examples of Visual Compositions:
I liked this video because instead of showing you the importance of lead room and how to achieve it. The video shows how to create the lead room and why it’s important but then goes on to show you how to morph and manipulate it to give different feelings to a scene. It takes a simple and basic type of visual composition and levels it up a step.
This video describes depth of field and the 3 main factors that affect it in the most plain and simple way while also showing interesting visual examples. I’ve been given the depth of field lesson many times and honestly I’m not sure why but I just like this guys simple lesson and always go back to it when I forget when of the factors and which way it should move to increase or decrease my depth.
I like how this video ties in the knowledge you already have of depth and leading room to discuss how to really using leading lines to their most effective ability. When you can find the sweet spot of a leading line with your main subject, so not too far over and not flat/ straight on looking at them then your utilizing the lines of everyday life to get a shot with great depth but still visible lines.
My Montage Pre-Production:
After reading the textbook and the different articles and looking at different interesting visual examples of different compositions I went out and tested my knowledge of the different basic visual composition with a photography scavenger hunt showing how the same type of photo can become much more interesting by utilizing these different techniques.
Once completing my scavenger hunt I felt I had mastered visual composition and began to dive into the pre-production of my montage. I chose one of my favorite places to visit back at home, which is Sandy Hook park and beach. My friends and I have been visiting and exploring here for years.
I did some research on the park and then wrote out a short but interesting and informative script that really captured all the fun things the park has to offer and then using my knowledge of different shot compositions I created a detailed shot list and after that drew out my entire storyboard. After I finished creating the pictures I went back and added all the different technical aspects like what direction the camera was going to move in and if there could by any kind of variation to the shot if I needed to change it in the moment once I got on location.
Check out my pre-production packet below and see what I have planned out for my montage coming soon.
